Crafty Thursday #18: Card Sketches

Hello everyone! Good to be back to the blog!

I’d like to share about card sketches today. Why? Because, this seems to have exploded online in the last month! Call them what you will (patterns, designs, templates, recipes) but this seems to be the latest buzz in the card making realm. In fact, the new 2024-2025 Stampin Up! catalog has 20 card sketches throughout the pages, and all of them are showcased along the bottom of page 22. Drop me a comment if you’d like a paper catalog, or see the right sidebar for a digital version.

What is a card sketch? It’s simply the pattern you will use to create a card. You can find them on Pinterest (look for me while you’re there!), on You Tube, the sources are endless! My wonderful Team Leader, Lorriane Cich has some great videos using her simple and elegant sketches; check her latest on using Designer Series Paper squares. I have printed numerous instruction sheets from many of the people I watch, and I have Julie Bolhuis’s book with 54 fun fold templates.

Essentially, you follow the directions! It’s like following a sewing pattern or a cake recipe. Gather your ingredients, measure them, and add them in the correct order. A sketch typically doesn’t have directions to go with it, so it’s a “use your imagination” type recipe rather than specific ingredients. You don’t have to use a specific color card stock or the exact circle die. You can pick and choose from among your stash of great supplies! Is it fun to get “all the things”? Of course it is! But, the point of using a sketch, with no specific products attached to it, is for you to use the products and supplies you already have. I bet many of you have an entire shelf of stamp sets, card stocks and ink pads. Dig in and find ones that you haven’t used in a while, and CASE a sketch! (Copy And Selectively Edit)

To show you just how simple this can be, I will share what I am working on creating to keep my card ideas and ones I’ve made. It’s simple dot grid notebook paper that I printed from Printable Paper. I like the dot grid because I can make nice, straight lines or other shapes and get them pretty good on scale. I’m sure there’s a way to do this digitally as well, but I just like the feel of plain old pencils and paper. 🙂

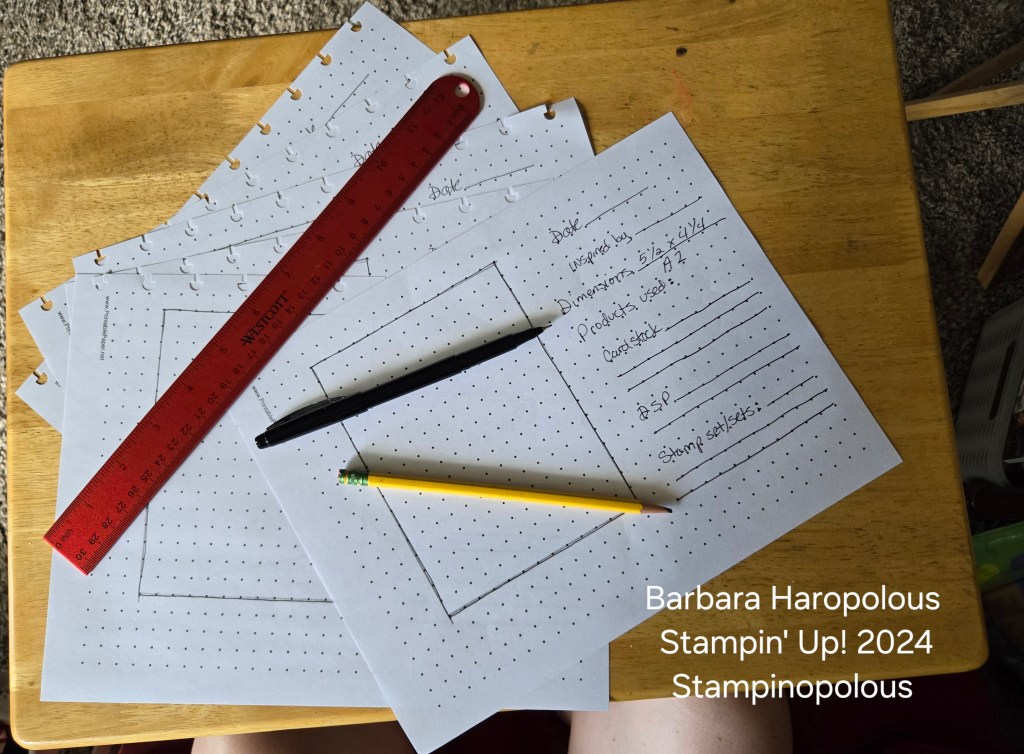
I used the left side to sketch out the card base. To the right, I have a place for the date, who I CASE’d it from or is it my own idea, the dimensions, card stock and Designer Series Paper used, stamp set and any other pertinent info. I did realize after I copied my template and punched it for my disc binder, that I forgot to make a spot for inks used! *facepalm* But, there’s plenty of room on the back of the sketch for other comments and instructions, so…yeah, let’s go with that! Then you simply sketch out your design pattern.

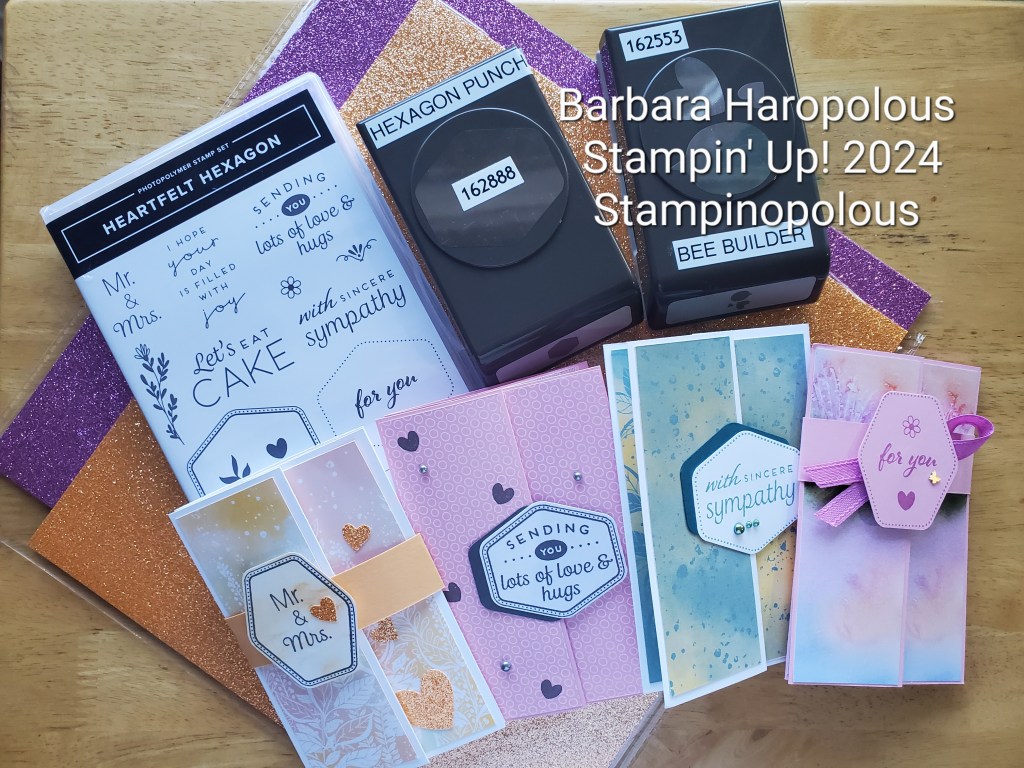
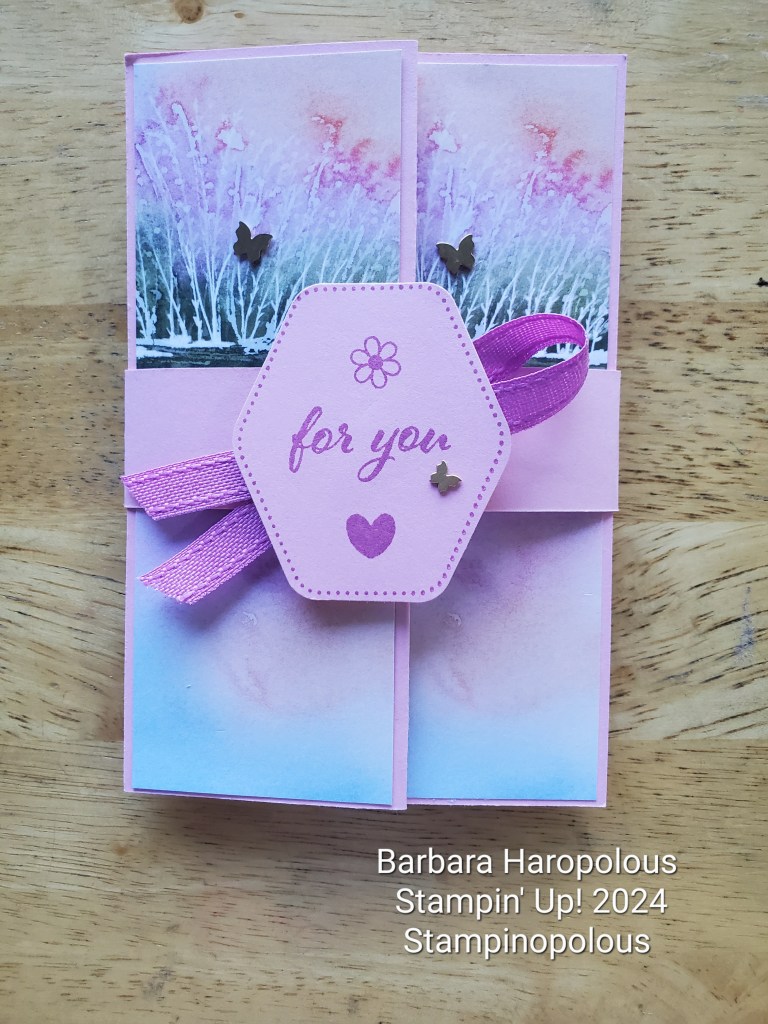
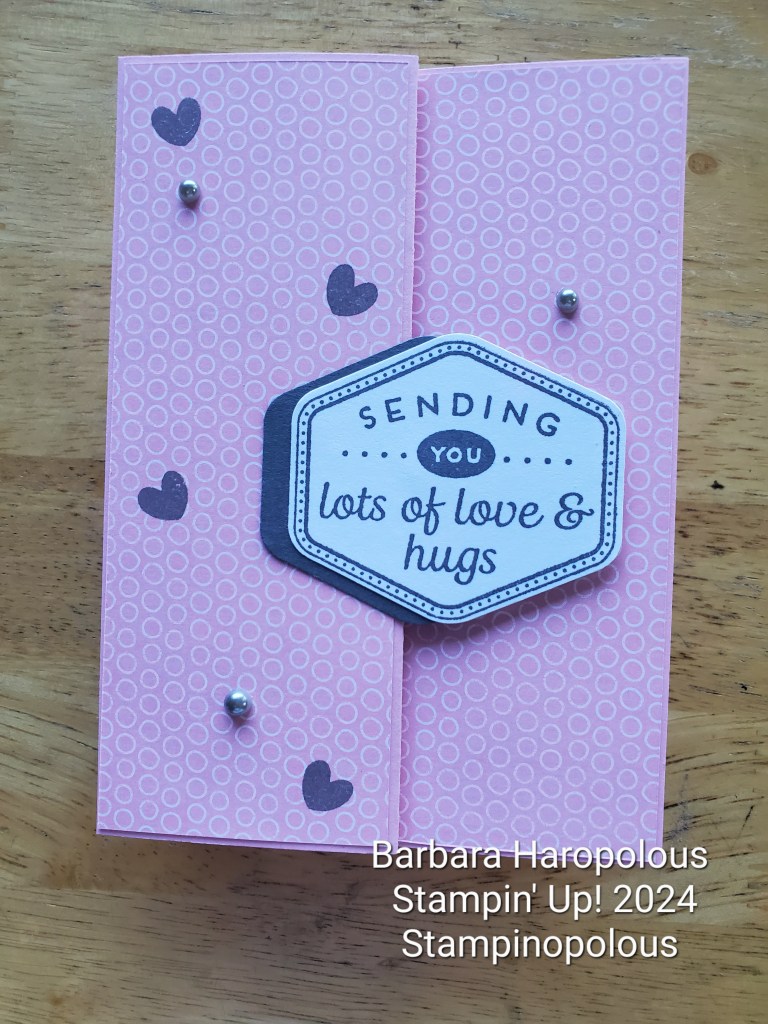
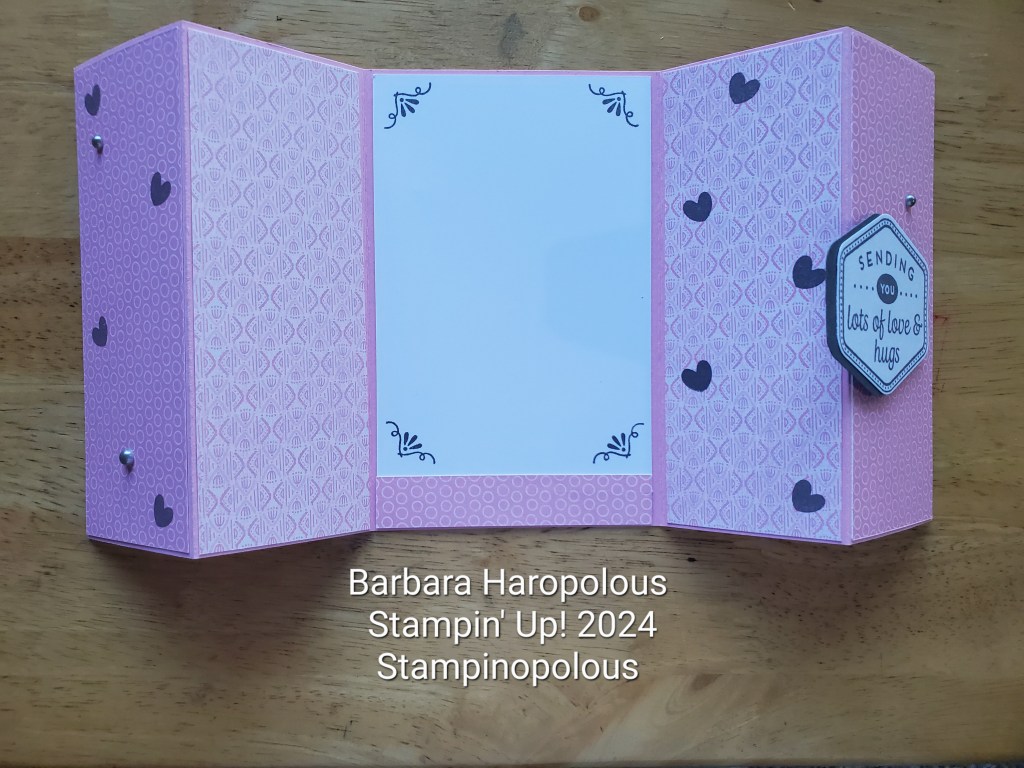
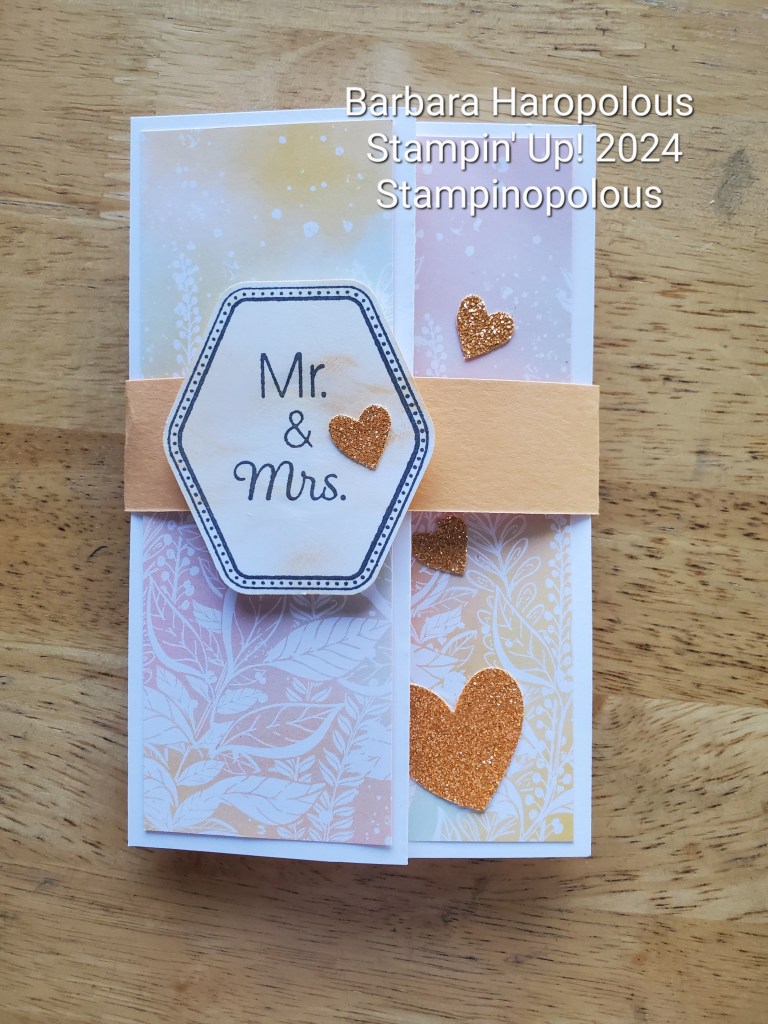
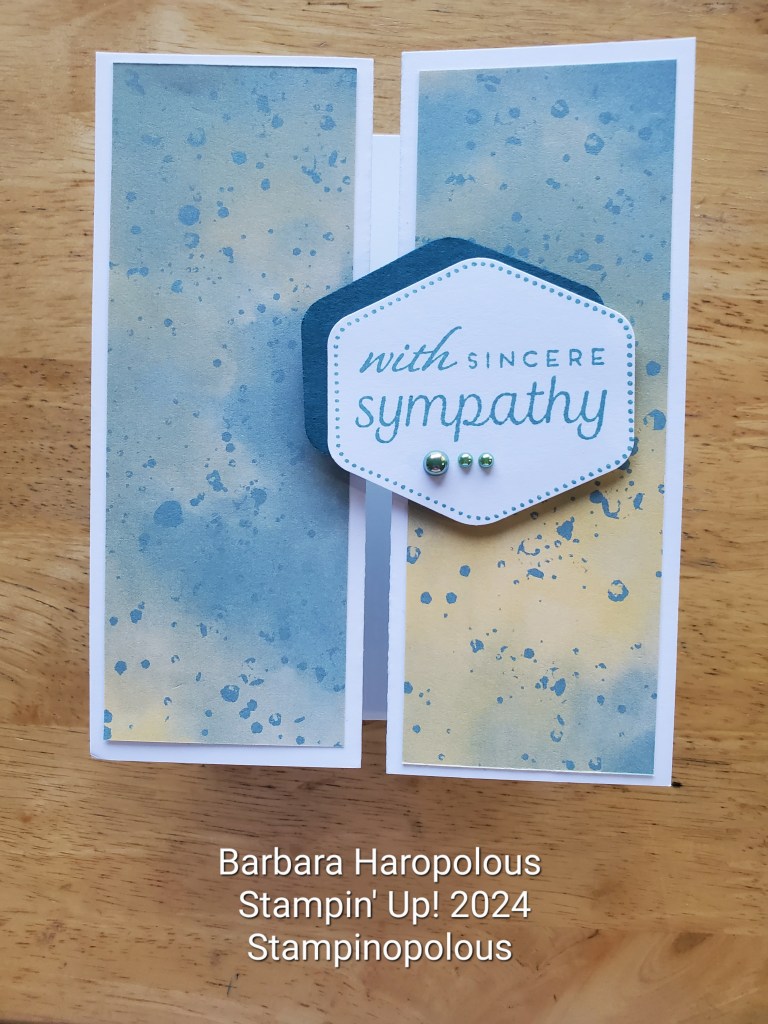
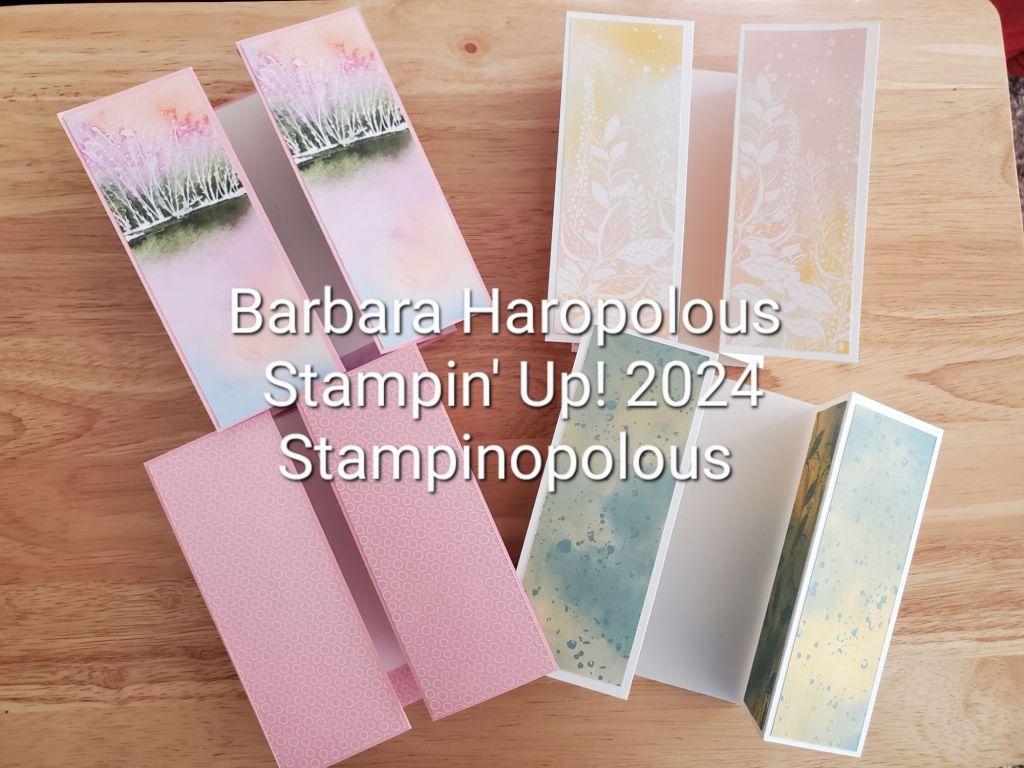
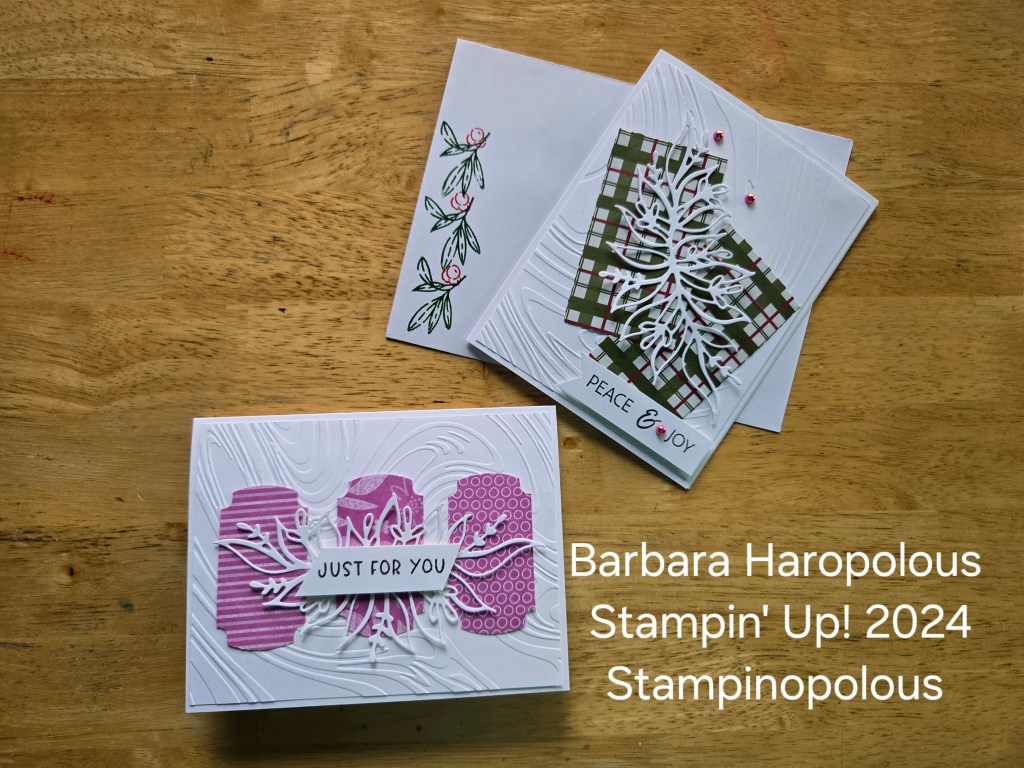
In my example, I’m using my team leader Lorraine’s latest team challenge. It featured an A2 size card (5.5 in x 4.25 in), an embossed layer, 3 rectangles and a sentiment strip.

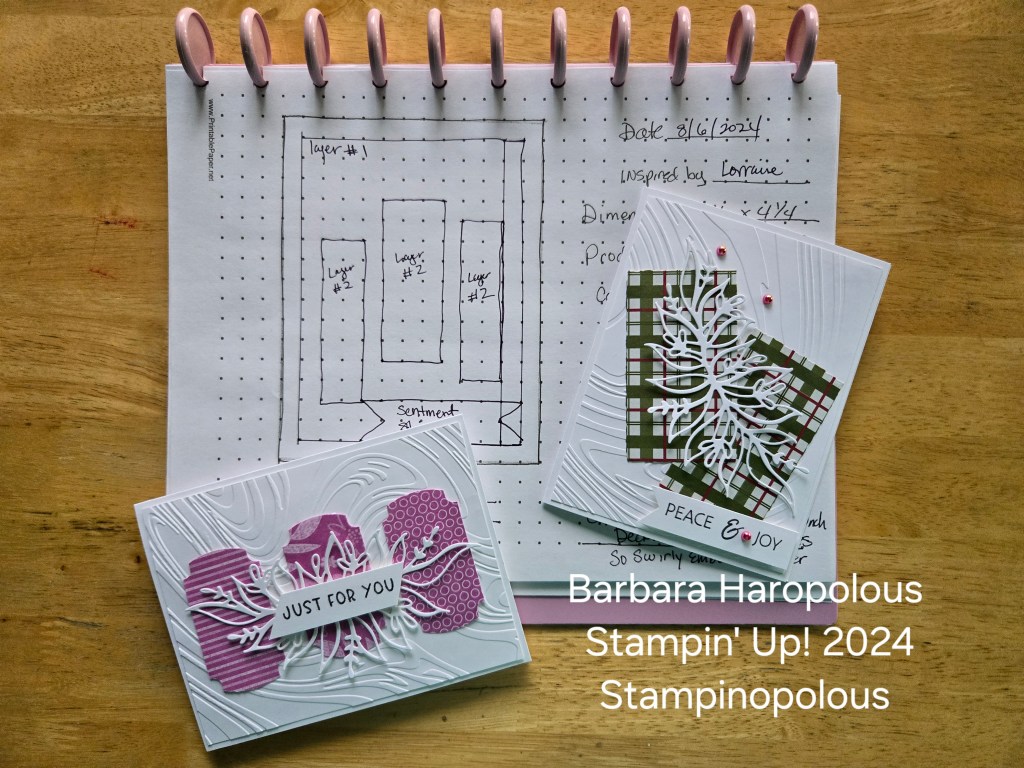
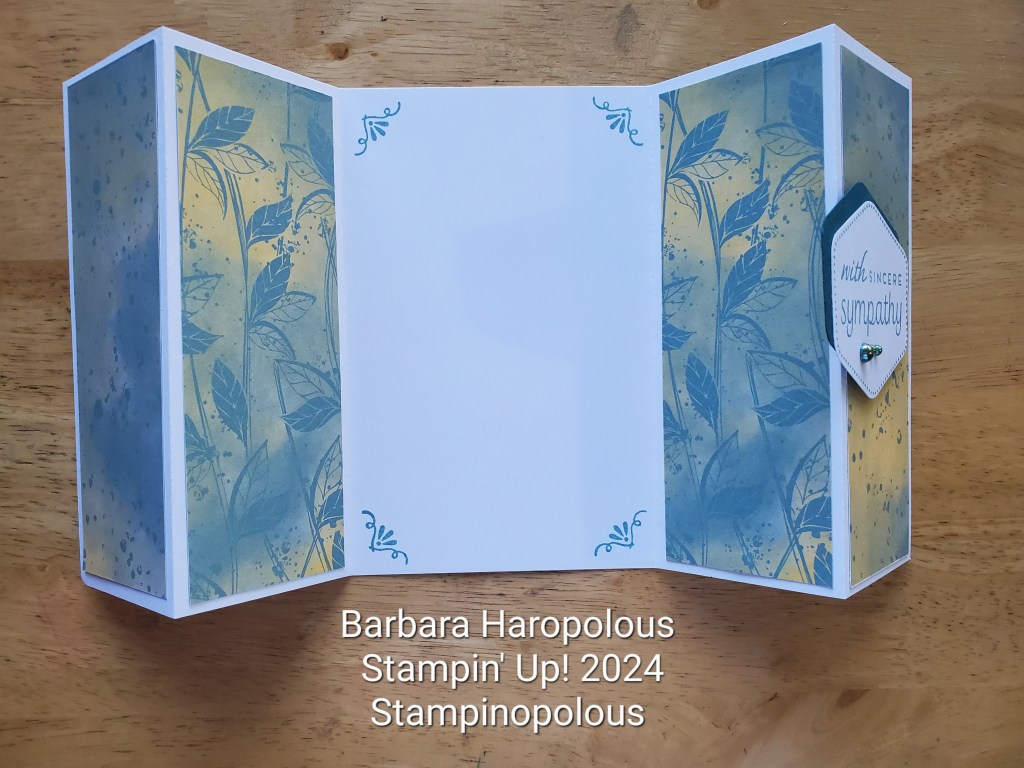
I created 2 cards using this sketch; a vertical Christmas card and a horizontal anniversary card for my hubby (we celebrated 41 years on Tuesday!) I used the ideas and modified to my supplies and needs. I added a bit of bling to them as well, but this is a simple and easy pattern to follow without any extras. On the Christmas card, I only used two of the three rectangles. Another modification that is easy to make once you have the basic idea. I have the template tucked into the back of my binder so I can print more when needed. And, don’t forget: no naked envelopes! 😉

There are several sources for free PDF’s to keep a card sketch list. Search on Pinterest or Google for “card making supply list.” You can also purchase a Creative Companion, which is a collab between Trinity Stamps and Mary Gunn of Craft Roulette. I highly recommend you watch an episode or 6 of Craft Roulette. It’s fun and informative and you’ll have more card ideas than you can make!

I hope this has helped you in your card making and crafting endeavors! Do you keep a sketch/pattern book of your creations? Let me know in the comments!

Thanks for popping in! See you next time, and blessings to you!

Barb

Barbara Haropolous, Independent Stampin’ Up! Demonstrator, USA

Product Comparison: Black Ink Pads

Hi crafty friends!

Today, I am going to compare two black ink pads.

*Anything written in this post from here on out is my express opinion and nothing more. No one offered me compensation in any way, shape or form. The only LINKS that are my affiliates: the Memento Tuxedo Black ink and the Unbounded Love stamp set.

Black ink is very important for any stamping. You need a crisp outline for coloring that won’t bleed, and you want very clear sentiments. I have used Stampin’ Up! brand inks, Distress Ink and Gina K Designs ink.

To be very honest, I’m disappointed that Stampin’ Up! Doesn’t offer black ink. I love their inks and their trademark pads. However, for black, they carry Memento Tuxedo Black, which is widely available in craft stores and online. I have never liked this ink as much as the Stampin’ Up! brand inks, and I find myself constantly having to reink it (good think I got the reinker!). I don’t know if that has anything to do with living in the Denver, CO area (super dry!) or not. Please comment if you think that’s a possibility!

Editing to add: I mainly use Stampin’ Up! Pebbled Path for my “black” outlines and sentiments. It’s a nice, deep gray and I like the look of it.

I’ve been intrigued lately by Gina K Design’s videos. She has her own line of inks, so I tossed caution to the wind and ordered her Onyx Black ink pad and a cool, round stamp block.

Here’s the side-by-side, which I took with my Samsung Galaxy S24, natural lighting:

Cases are both easy to open. As you can see, the cases are about the same size, but the Gina K ink pad surface is larger. It’s a full half inch loner and a quarter inch taller. The thickness is the same (about 1/4 inch).

I used a simple Happy Birthday sentiment from the Unbounded Love set, stamped on Stampin’ Up! Basic White card stock. The Memento Tuxedo Black needs a second stamping; the image just doesn’t have the oomph I want with a single stamp. I don’t always want to break out the stamp positioning tool for a simple sentiment and multiple stampings. The Gina K Black Onyx has a wonderful, deep black color with only one stamping. The image is clear and really stands out.

What I loved:

  • The ink is great! My outlines and sentiments are all crisp and clear, and all in one application
  • Cost: at $7.99 for the ink pad
  • Dries fast!
  • Can be used for all techniques
  • Refill available, $5.99

What I would like better:

  • If it had a foam pad
  • If the pad was a bit bigger, but it is bigger than the Memento
  • If it had a nifty all-in-one case

None of those “better” things, however, are deal breakers. I much prefer the Gina K Designs Black Onyx ink over the Memento Tuxedo Black. The Gina K will be my absolute go-to black in for the foreseeable future.

What is your favored black ink? Is there another one I should try out? let me know in the comment section!

Next product comparison: that groovy round stamp block 😉

Thanks for popping in, and, as always. blessings to you!
Barb

Barbara Haropolous, Independent Stampin’ Up! Demonstrator, USA

Nothing Crafty Thursday

Well, friends, that header says it all! 😉

It’s been a rough week here, so nothing crafty happened, with the exception of my web cam arriving.

So, I will try for a live tomorrow (Friday, June 7) at 1:30 mst. We can look at the different sizes of the Stampin’ Emboss and Die Cut Machines and maybe peep in the catalog at some stamp and die bundles which are all on sale this month!

Check my Facebook and You Tube channels! 😁

Have a great day!

Till next time, get creative and bless someone!

Barb 🌻

Crafty Thursday #17: The Double Z Fold

Hello Crafting Friends!

Let’s take a look today at the Double Z Fold card.

A Double Z Fold will have the folds on both the left and right sides, and the centers can either overlap or meet in the middle. It stands up nicely for display. I will show you an overlap example and a project sheet with all the measurements will be available to newsletter subscribers.

The Overlapping Double Z Fold: I began with a 12 in x 12 in piece of colored card stock. In my examples, I chose the new 2024-2026 In Colors! They are just so bright and pretty; they feel so summer!

For the Designer Series Papers, I used the 2024-2026 In Color (this paper is available in all the Stampin’ Up! color families!) and Thoughtful Journey. I love the watercolor images on the Thoughtful Journey papers; both sides are beautiful. I used a scene, and cut my paper so that it would stretch across both sides of the card. The colors are soft, and the sentiments from the Heartfelt Hexagon stamp set fit perfectly with the peaceful feel of the card. I used the Heartfelt Hexagon punch and stamp set for the focal image on all the cards shown in this post. It’s such a versatile set! The brass butterflies and Petunia Pop ribbon finished the look off nicely.

On the other card, I used the same Pretty in Pink card stock, and the 2024-2026 In Color Designer Series Paper. I love anything polka dot, and I thought the Pebbled Path ink really gave a nice contrast; who doesn’t love pink and gray? It’s a classic combo! Pebbled Path is a 2022-2024 In Color, so you want to grab it while it’s still around! I punched a hexagon in Pebbled Path card stock to shadow the focal image, stamped a few curly-doodles on the inside, and added a strip of the DSP along the bottom. I added some playful hearts and finished it off with the Basic Gray and Smoky Slate Pearls. The focal image has dimensionals on the back of the right side only, so the left side slides underneath to help it stay closed.

One the second set of cards, I have used some retired Designer Series papers, along with some coordinating new products. For the wedding card, I broke out some of the new 2024-2026 In Color Specialty Glimmer Paper and the Bee Builder punch to add some sparkly hearts! The Pumpkin Pie color worked so well with the colors on the DSP! I also used Pumpkin Pie cardstock on the belly band and some Pumpkin Pie ink blended on the focal point, which made it pop all the more! On the sympathy card (I told you this was a very versatile stamp set!) I added the background hexagon in Pretty Peacock cardstock to offset the Lost Lagoon ink, and kept the embellishments to a minimum. I feel understated is the way to go with a sympathy card.

I hope you enjoyed this look at the Overlapping Double Z Fold card. As you see, there are many occasions to use this card for. Come back next week for another set of cards using the new In Colors and Thoughtful Journey Designer Series Paper. It’ll be SIP cards; Stamps, Ink and Paper! If you shop for any of the products I’ve linked today, please use my Host Code, which is on the sidebar. I appreciate your support!

I plan to do two live demonstrations in June; if you are signed up for my newsletter, you can get all these details right in your inbox!

Thanks for spending some time with me today. Have a wonderful and blessed weekend!

Till next time, Barbara

In the Word Wednesday #16 God Is My…

Hello, hello!

I’m coming to the end of my devotional book, Praying the Names of God by Ann Spangler. Last week, there were several names I learned about, all having to do with God being our Dwelling Place (Moan (ma-OHN)), our Refuge (Machseh (mach-SEH)), our Shield (Magen (ma-GAIN)), our Fortress (Metsuda (me-tsu-DAH)) and our Strong Tower (Migdal-Oz (mig-dahl OHZ).

This week, I’m focusing on the verses that discuss God as my Dwelling Place. I’m still continuing on through the book (this week is Judge, but I really want to keep my focus on what God is to me. To really make it personal. I looked up the verses and copied them into a document in several different versions/translations. The collection of verses are all in Psalms (my all time favorite book in the Bible!) All are linked in the English Standard Version, but you can search them in the version you prefer on Bible Gateway.

Psalm 27:4-5

Psalm 31:20

Psalm 90:1-2 I am partial to this verse, in particular, in the King James Version

Psalm 84:10-12

I’d like to share the document with you. I hope that it blesses you as you read all the things that God Is.

Thanks for coming by! Have a wonderful week!

Stampin’ Up! June 2024 Promotion!

BIG NEWS!!!

💥 June 5 – 30, Stampin’ Up! is having a HUGE “Bundle” promotion! There are so many great bundles in the new catalog!

💥 Get an additional 10% discount on stamp and die bundles only. Not applicable on suites or stamp and punch bundles. Stamp and die bundles are normally 10% off, and in June you get even MORE off!

💥 Save 10% on BOTH the Stampin’ Cut & Emboss Machine and the Mini Stampin’ Cut & Emboss Machine (White or Boho Blue)!!! THIS is a great deal! The machine comes with all plates and is ready to go! You only need to attach the crank handle and you can die cut and emboss to your heart’s delight!

💥 The 10% discount will automatically apply. There’s no special codes needed for the promo! Please, though, do use my June Host Code, which will be available on June 1!

💥 Get your shopping list ready for June 5! Shop early, as products go FAST, FAST, FAST!

👉 Please note: Close To My Heart products are not included in this sale

#creating #createandblessothers #stampinopolous #stampinup #cards #cardmaking #papercrafts #salesalesale

Happy Sunday! 5.19.2024 Update

Well, friends, it has been a hot minute.

We both had some minor health things to deal with, and all is well. It was a trying few weeks, and I am ready to get back on track with my cards and creating 👏

I’m working on some fun folds, and my May Paper Pumpkin kit arrived. What a great kit! I will do a live unbox and card creation tomorrow. (May 20, 2024) I hope Streamyard has gotten the bugs worked out so it can be on both Facebook and You Tube. Please check both to find me! If you Subscribe to either, you’ll get a notification when I am on.

Here’s a peek at my fun folds. Video coming soon! I hope to see you there!

Create With Me! 12×12 Sampler

Companion Video on Facebook and You Tube

Hello Friends! I’m so excited that my new blog/website is finally ready. I hope you enjoy looking around 🙂

Today, I went live (FINALLY!) on FB and YT with my sampler project. It was fun to recreate from the original video by Rachel Tessman (StampYourArtOut.com) that I saw a while back. She used the beautiful Perennial Lavender paper and elements, but I wanted to try it out with some fun spring colors. I opted for one of the Sale-A-Bration DSP’s, Sunny Days, and some bright colored card stock.

I also went a little crazy making several using some other fun DSP and embellishments; I made a Rock and Roll sampler, one for my amazing hubby with Trusty Toolbox DSP, another Sale-A-Bration offering, and a smaller sampler for Easter featuring the Easter Lilies stamp set. I also created one using the NEW 2024-2026 In Colors in the video! Pictures of all below and in the Gallery

Below is a list of general measurements and the products I used. The highlighted products are available in my online store. Don’t forget, the new catalog goes live on May 1, and many of the products featured in this post may be retiring. Stampin’ Up! has it’s big sale going on now through April 30, so you may be able to grab some sweet deals, some products are as much as 60% off! Retiring products are available as supplies last, so my advice is, go shop quickly! To the best of my knowledge, as of this posting, all highlighted products are available.

If you shop and your order is under $150, before tax and shipping, please use my host code, linked on the sidebar. If you’re over that amount, you will receive your own Stampin’ Rewards!

Have a fantastic weekend! Bless someone with a hand made card this week!
Barbara

  • Basic White Cardstock
    • 12” x 12”
    • 1” x 4” sentiment strip
    • 2-5/8” x 2-5/8”
    • Scraps for hearts & leaves
  • Colored Cardstock of choice
    • (7) 3” x 3” , 2 of which are dry embossed
    • 3” x 6-1/4”
  • Designer Series Paper of choice
    • (4) 2-3/4” x 2-3/4”
    • 2-3/4” x 6 for lower right
    • 2-1/2” x 2-1/2”
    • Scraps for leaves
  • Ribbon
    • (2) 3-1/2″

I used:

Fun Patterns Embossing Folder, set of 2 (available May 1)

Nested Essentials dies

Card Stock, various colors

Layers of Beauty Bundle (stamps, dies, masks, available May 1)

Bee Builder punch

Perennial Postage stamp set

Rock and Roll 12×12 Designer Series Paper

Rock and Roll stamp set and dies, linked above in post

Poetic Expressions 12×12 Designer Series Paper (Easter sampler)

Paper Trimmer

Crafty Thursday #15: One Sheet Wonder! Featuring the New Online Exclusive Flowering Zinnia Suite


MARCH 2024 HOST CODE: T9DBMCCP

Hello Crafting Friends!

It’s been quite the day around here, with waiting on the big snowstorm to hit Denver. Thankfully, the hubby and I headed out yesterday and got on some staples. I made a nice crock pot full of sauce and meatballs (pictured on my Instagram) before I got started creating my 12 inch x 12 inch One Sheet Wonder. I think it’s a tad unique, if I do say so myself. 😉

I’ve been waiting to get into this suite…as of today, it’s unavailable, but fear not! It WILL be back in stock because it’s a hot seller! (ETA, end of April: Designer Series Paper is currently available, as of this post) The Online Exclusive Flowering Zinnia Suite has everything to make spectacular cards! I’ll show you a few others I made below. Let me show you what I created with this suite!

I don’t know why, but I’m a bit obsessed with Slimline Cards, and the minute I saw this paper, I knew I had to make some! I will link all products used at the end of the post. I’m hoping to get a companion video up on Friday (or later tonight) on my Facebook and You Tube pages to demonstrate exactly how I cut the Designer Series Paper. There’s very little waste, which is what I was aiming for…who wants to waste such gorgeous paper?! I used the sheet featured in the Stampin’ Up! stock photo. It was designed to make cards with little waste. I’ve already seen many beautiful samples online. But, I think I came up with a fun and unique pattern…

I had the dimensions for a normal sized Slimline Card, but I wanted to be able to use as much of the pattern on the sheet as I could. It wasn’t quite high enough to make the 9 inch long version, so I made a 6 1/2 in one! It will still fit in a standard business sized envelope. As you can see, I got to work cutting up the card stock, then I turned to the 12 x 12 Designer Series Paper. I had to use math *shudder* but I survived. The way my OSW goes, you get a total of SIX cards, three of the Short Slimline Cards, as I’m calling them, and 3 standard A2 cards. The cutting is a little unusual, which I why I will try to get that video up. I will explain it as best I can:

~ Start with your 12 x 12 sheet with the patterns to the left and right of the cutting blade. You will be cutting on the white space with this particular paper. 
~ Cut at 5 1/2. You’ll have 2 12 inch long sheets, one at 5 1/2 inch high and the other at 6 1/2 inch high. Set aside the taller one.
~ Cutting with the white space of the12 inch side across the top of the trimmer, slice this piece into 4 inch panels. These will be the front panels of the three A2 cards.
~ Take the taller piece, again with the white space of the 12 inch side across the top of the trimmer. Cut this into 3 1/2 inch panels. There will be one 1 1/2 inch piece left over. Cut this into three 1/2 inch strips. These will be the front panels and decorative strip of the Short Slimline cards.
To cut the A2 card bases:
~ Using 8 1/2 x 11 in card stock, cut in half on the 11 inch side at 5 1/2 inches. Score @4 1/4 inches.
To cut the Short Slimline Cards:
~ Using 8 1/2 x 11 in card stock, on the 11 inch side, cut at 7 1/2 inches.
~ Rotate the card stock and cut at 6 1/2 inches.
~ Rotate back to the 7 1/2 inch side and score @ 3 3/4 inches.
Other supplies needed are:
* Stamp set of choice
* Die cut or punched shape for your focal image
* Coordinating ink
* #6 envelopes for the Short Slimline Cards (link to envelopes.com I am not an affiliat 
You will also need some panels of Basic White for the inside of the cards; 4″ x 5 1/4″ for the A2 cards and 3 1/4″x 6 1/4″ for the Short Slimline Cards.
To assemble the cards:

~ Fold on the score line, “bump” side to the inside. 

Burnish with your bone folder. 
~ Add the inside panel with adhesive of choice (stamp first, if desired)
   ~ A2 card: add the front panel, centering so there is 1/4″ border on either side of panel. You will have to trim off a scant amount from the top or bottom, depending on how you want your image. Attach to all 3 bases and let dry (if using liquid glue) before trimming the extra. 
   ~Short Slimline card: add the front panel, centering for a 1/4″ border around whole panel
~ Add your focal image/sentiment and any embellishments.

I’d love to see your cards using this One Sheet Wonder! You can post them on my Facebook page, in the comments under the corresponding post to this blog entry.

Here are the ones I made using the Flowering Zinnia Designer Series Paper and some using the Perennial Lavender Designer Series Paper

Thank you so much for stopping in! I hope you create some beautiful cards this week and bless others!

Barbara 

*any links provided are for my online store through Stampin’ Up! I earn a commission on any sales from those links.

*Please use the March 2024 Host Code at the top of the post when ordering. This helps me earn products to show you! If your order is above $150 in product, don’t use the code, as you will enjoy your own rewards! 

*If you’re interested in joining Stampin’ Up! as a demonstrator or as a discount shopper, you’ll get $125 worth of products of your choice in your Starter Kit for only $99!. Email me for details!

Products I used in my examples:

Stampin Up! Colored Card stock, Petal Pink 146985 and Garden Green 102584 (Annual Catalog, pg 122-123)

Heartfelt Hexagon Punch 162888 (Jan-Apr 2024 Mini Catalog, pg 12)

Nested Essentials Dies 161597 (Annual Catalog, pg 165)

Perennial Postage stamp set 162598 (Jan- Apr 2024 Mini Catalog, pg 25)

Perennial Lavender 12″ x 12″ Designer Series Paper 162593 (Jan-Apr 2024 Mini Catalog, pg 23, linked above)

Flowering Zinnia 12″ x 12″ Designer Series Paper 163469 (Online Exclusive, linked above)

Sweet Sorbet 1/4″ Bordered Ribbon 162558 (Jan-Apr Mini Catalog, pg 9)

White 3/4″ Frayed Ribbon CLEARANCE ITEM!!! 158138

Adhesive Backed Shiny Sequins 163484 (Online Exclusive)

Brushed Brass Butterflies 158136 (Online Exclusive)

Iridescent Rhinestones Basic Jewels 158130 (Annual Catalog, pg 140)

Classic Stampin’ Pads, Garden Green 147089, Early Espresso 147114, Petal Pink 147108, Flirty Flamingo 147052, Berry Burst 147143 (Annual Catalog, pgs 122-123)